
Ankle Mobility Assessment
The knee-to-wall test is a simple way to measure weight-bearing ankle dorsiflexion. Done consistently, it gives you a useful baseline for comparing sides and tracking change.
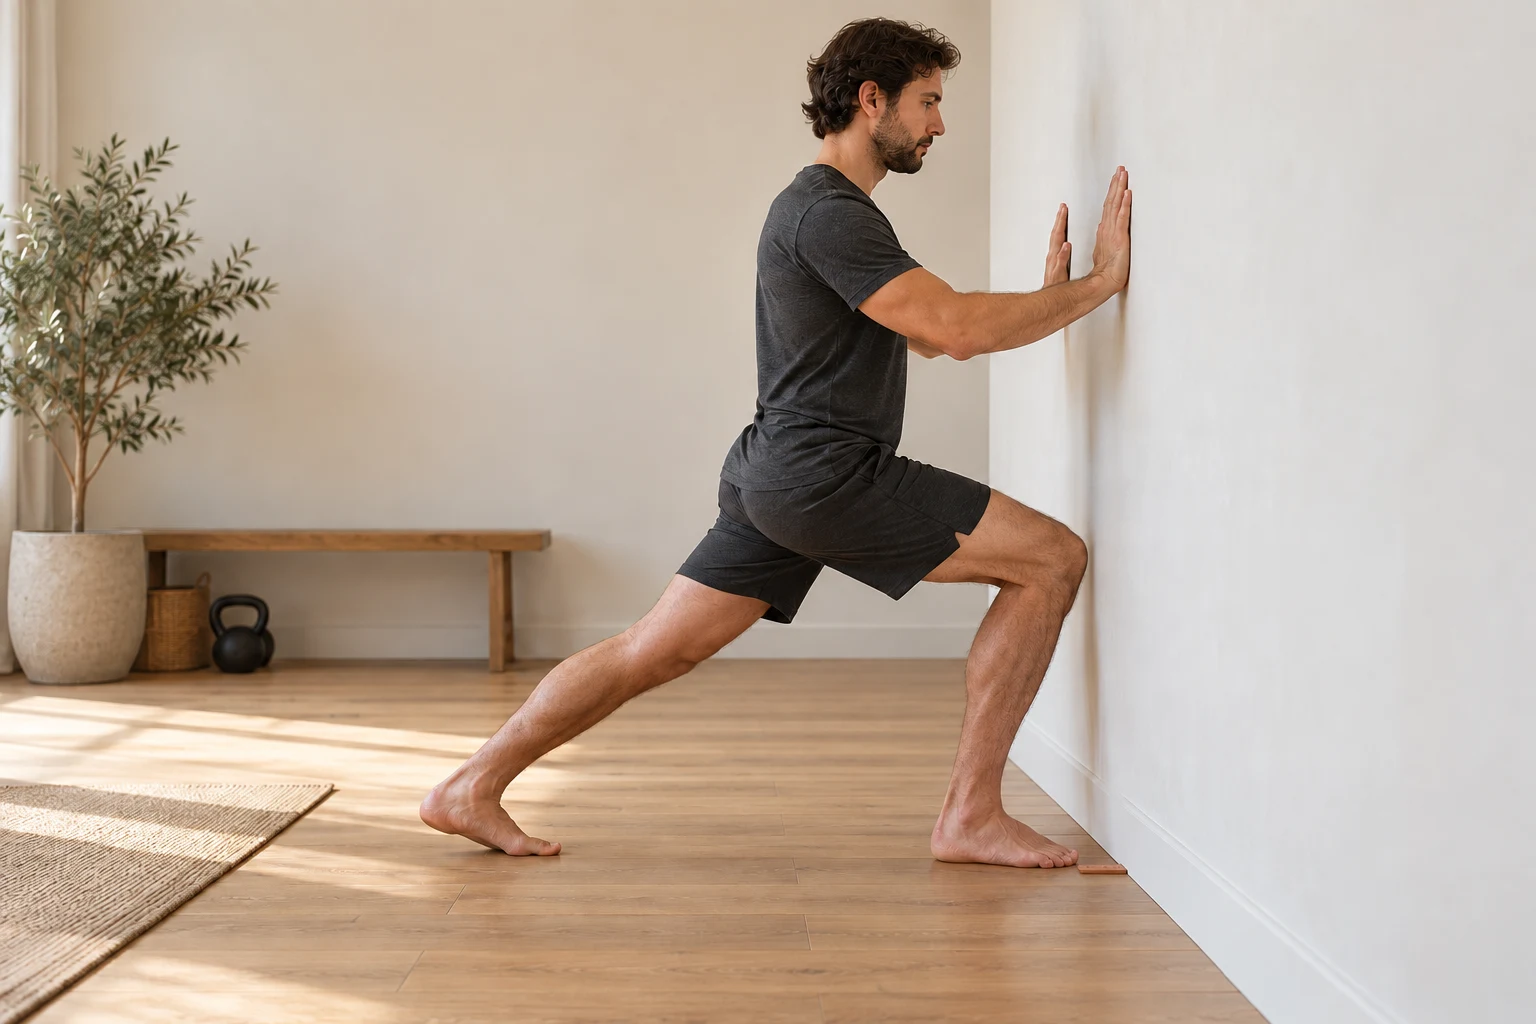
Face a wall with one foot flat and pointed forward. Drive the knee toward the wall without lifting the heel or letting the arch collapse. Move the foot backward until you find the farthest distance where the knee can still touch. Measure from the wall to the front of the longest toe and repeat on the other side.
The knee-to-wall test—also called the weight-bearing lunge test or dorsiflexion lunge test—looks at how far your shin can travel forward over a planted foot. It is widely used because it resembles the loaded ankle position needed in squats, lunges, stair descent and many athletic movements.
Unlike a relaxed ankle measurement taken while sitting or lying down, the knee-to-wall test measures dorsiflexion while you are bearing weight. Research has found the weight-bearing lunge test to have good reliability when the setup and measurement method are kept consistent.
It is still a screening and progress-tracking tool—not a diagnosis. A result can identify a movement difference, but it cannot tell you by itself whether the limitation comes from the calf, ankle joint, pain, technique, previous injury or your individual anatomy.
What does the knee-to-wall test measure?
The test measures weight-bearing ankle dorsiflexion. Dorsiflexion is the motion that brings the top of the foot toward the shin. In a closed-chain movement with the foot planted, it appears as the shin and knee moving forward over the foot while the heel stays down.
This movement contributes to:
- Descending into a squat without the heel rising prematurely
- Moving through a split squat or forward lunge
- Walking downhill and descending stairs
- Absorbing force during running, landing and changes of direction
- Maintaining foot contact during balance and mobility exercises
The test does not evaluate every part of ankle or foot function. It does not directly measure strength, balance, lateral stability, plantar flexion or how you move at full speed. Think of it as one useful measurement inside a larger movement picture.
How to perform the knee-to-wall ankle mobility test
What you need
Test barefoot or in the same flat footwear each time. Avoid using shoes with an elevated heel because the heel lift changes the ankle position. If you need balance support, place your fingertips lightly against the wall or a sturdy object without pulling yourself forward.
Warm up briefly
Walk for a few minutes or perform several easy ankle rocks. Testing cold one day and fully warmed up another makes the comparison less useful.
Place the test foot forward
Face the wall with the test foot flat, the toes pointing generally forward and the heel directly behind the forefoot. Place the other foot behind you for support.
Guide the knee forward
Bend the front knee toward the wall. Let it track in line with the middle toes rather than collapsing sharply inward. Keep the entire heel in contact with the floor.
Find your farthest successful position
If the knee touches easily, move the foot slightly farther from the wall. Continue in small increments until you find the greatest distance where the knee still touches without the heel lifting or the foot losing position.
Measure and record
Measure the distance from the wall to the front of the longest toe. Record the side, distance, footwear, warmup and any symptoms or compensations.
Repeat on the other side
Use the same procedure, number of warmup attempts and measuring method. Perform two or three trials per side and record the best clean attempt or the average—just use the same approach when retesting.
If the heel lifts, the arch collapses markedly, the foot turns far outward or the knee reaches the wall only through a painful position, shorten the distance and repeat.
Three ways to measure the result
Several versions of the weight-bearing lunge test appear in research and clinical practice. The most accessible home method is toe-to-wall distance. Whichever method you select, consistency matters more than switching between several measurements.
| Method | How it works | Best use | Limitation |
|---|---|---|---|
| Toe-to-wall distance | Measure from the wall to the front of the longest toe at the farthest successful position. | Simple home testing and repeated personal tracking | Foot length and exact toe position can affect comparisons between different people. |
| Shin angle | Measure the forward angle of the tibia with an inclinometer or appropriate phone tool. | Clinical or coached assessment when the same device and placement are used | Device position and technique can introduce error. |
| Side-to-side difference | Compare results from your left and right ankles using the same method. | Spotting asymmetry and tracking an affected side | Two similar results can still both be limited for a specific task. |
Where exactly should you measure?
Place the zero end of the tape at the wall and measure straight back along the floor to the end of the longest toe. Some people have a second toe longer than the big toe, so use the actual longest toe and document your choice.
Marking the successful foot position with painter’s tape makes the result easier to verify. Keep the tape measure aligned with the direction of the foot rather than measuring diagonally.
How should you interpret your knee-to-wall result?
Online guides often present one distance—commonly around 10 centimeters—as a universal pass-or-fail standard. Real interpretation is more nuanced. Results vary with the measurement technique, age, body proportions, activity demands, warmup and the population being assessed.
For home use, the most meaningful questions are:
- Can you perform the test without pain or obvious compensation?
- Is there a noticeable difference between your left and right sides?
- Does a lower result correspond with a movement problem you actually experience?
- Does the result improve when you repeat the exact same test after a period of appropriate training?
Use your first clean test as a baseline
Your baseline is more valuable than chasing a generic number. Record both ankles, then retest under the same conditions. Small day-to-day changes may reflect normal measurement variation, warmup or how hard you pushed rather than a meaningful change in mobility.
Research supports the reliability of the weight-bearing lunge test, but reliability does not mean every millimeter of change is important. Look for a repeatable trend and a corresponding improvement in the movement that matters to you.
Side-to-side differences need context
A difference between ankles can matter when it is consistent and relates to your movement. For example, one ankle may feel blocked during a split squat or make downhill walking noticeably less comfortable. But asymmetry alone does not prove injury or predict what will happen in the future.
If one side changed suddenly, remains painful or follows an ankle sprain, fracture or surgery, a qualified healthcare professional can evaluate factors the wall test cannot identify.
Simple tracking log
Common knee-to-wall testing mistakes
Letting the heel lift
A small heel rise creates extra forward travel without representing true weight-bearing dorsiflexion. Reduce the distance until the heel remains fully grounded.
Turning the foot outward
Excessive turnout changes the direction of the test. Keep the foot in a repeatable position that resembles how you want it to function.
Collapsing the arch
Some foot motion is normal, but dramatically rolling inward can create the appearance of more range. Maintain steady heel, big-toe and little-toe contact.
Forcing the knee inward
Guide the knee generally over the middle toes. Do not gain distance by sharply collapsing it toward the opposite leg.
Changing the warmup
Testing cold one week and immediately after a long workout the next makes the results difficult to compare.
Testing through pain
A painful result may reflect irritation rather than a simple mobility restriction. Do not force the knee into a pinching or sharp sensation.
What should you do after the test?
The next step depends on what you observed. If both sides move comfortably and the result supports your activities, you may not need a dedicated ankle program. Continue training through comfortable ranges and monitor the movement that prompted you to test.
If one or both ankles feel restricted, begin with low-intensity exercises that preserve good foot contact and control. Our ankle dorsiflexion exercise guide includes ankle rocks, calf-focused work and active strengthening options.
A slant board can provide a stable, repeatable incline for calf stretching and ankle work. If you use one, start at a modest angle and avoid forcing the joint. See our guide on using a slant board for ankle mobility.
Retest, but do not obsess over the number
Retesting every day can turn normal variation into unnecessary concern. A practical schedule is every two to four weeks, or at the beginning and end of a defined training block. Use the same wall, flooring, warmup, footwear and measurement method.
Also retest the task you care about. A larger knee-to-wall distance is only useful when it accompanies better control, comfort or performance in your squat, walking, hiking or training.
When not to self-test
Avoid forcing this test after a recent injury, surgery or during significant swelling. Seek appropriate medical assessment for sharp pain, catching, numbness, unexplained weakness, repeated giving way or an abrupt loss of motion. The knee-to-wall test cannot diagnose an ankle condition.
How this test connects to mobility training
The knee-to-wall test is a good example of the difference between general flexibility and task-specific mobility. The calf must allow adequate length, but you also need active control of the foot, ankle and knee while bearing weight.
If you are new to this distinction, read mobility vs. flexibility. It explains why stretching can improve available range while strength and coordination help you use that range.
Frequently asked questions
What is a good knee-to-wall test result?
There is no single number that fits every person and activity. A commonly discussed reference is approximately 10 centimeters, but technique, body proportions and population matter. Prioritize a clean, pain-free test, compare sides and track your own result consistently.
Should my knee go past my toes?
Yes, the test intentionally allows the knee to travel forward over the toes while the heel remains down. That is the weight-bearing ankle motion being assessed. The movement should stay controlled and comfortable.
Should I test barefoot?
Barefoot testing removes the effect of shoe cushioning and heel elevation. If you test in shoes, use the same pair each time and avoid comparing that number directly with a barefoot result.
How many attempts should I perform?
After several easy warmup repetitions, perform two or three measured trials per side. Record either the best clean attempt or the average, and keep that choice consistent when retesting.
Can I improve my result immediately?
Warmup and repeated practice can create a short-term change. That does not necessarily represent a lasting adaptation. Track results over several weeks and look for improvements that remain under the same testing conditions.
Does a limited test mean my calf is tight?
Not necessarily. Calf flexibility may contribute, but joint motion, discomfort, foot position, prior injury, strength and technique can also affect the result. The test identifies a limitation; it does not establish the cause.
Final takeaway
The knee-to-wall ankle mobility test is useful because it is simple, repeatable and connected to real weight-bearing movement. Its value comes from standardized technique: keep the heel grounded, control the foot and knee, use the same measuring method and compare like with like.
Treat the number as information, not a diagnosis or a score of how well your body works. Combine it with how you move and feel, then use appropriate exercises to address a limitation that actually matters.
Build ankle dorsiflexion
Once you have a baseline, use controlled exercises to work on the range and strength needed to move the knee forward over a planted foot.
See 9 Ankle Dorsiflexion Exercises
Leave a Reply