
Balance Foundry Exercise Guide
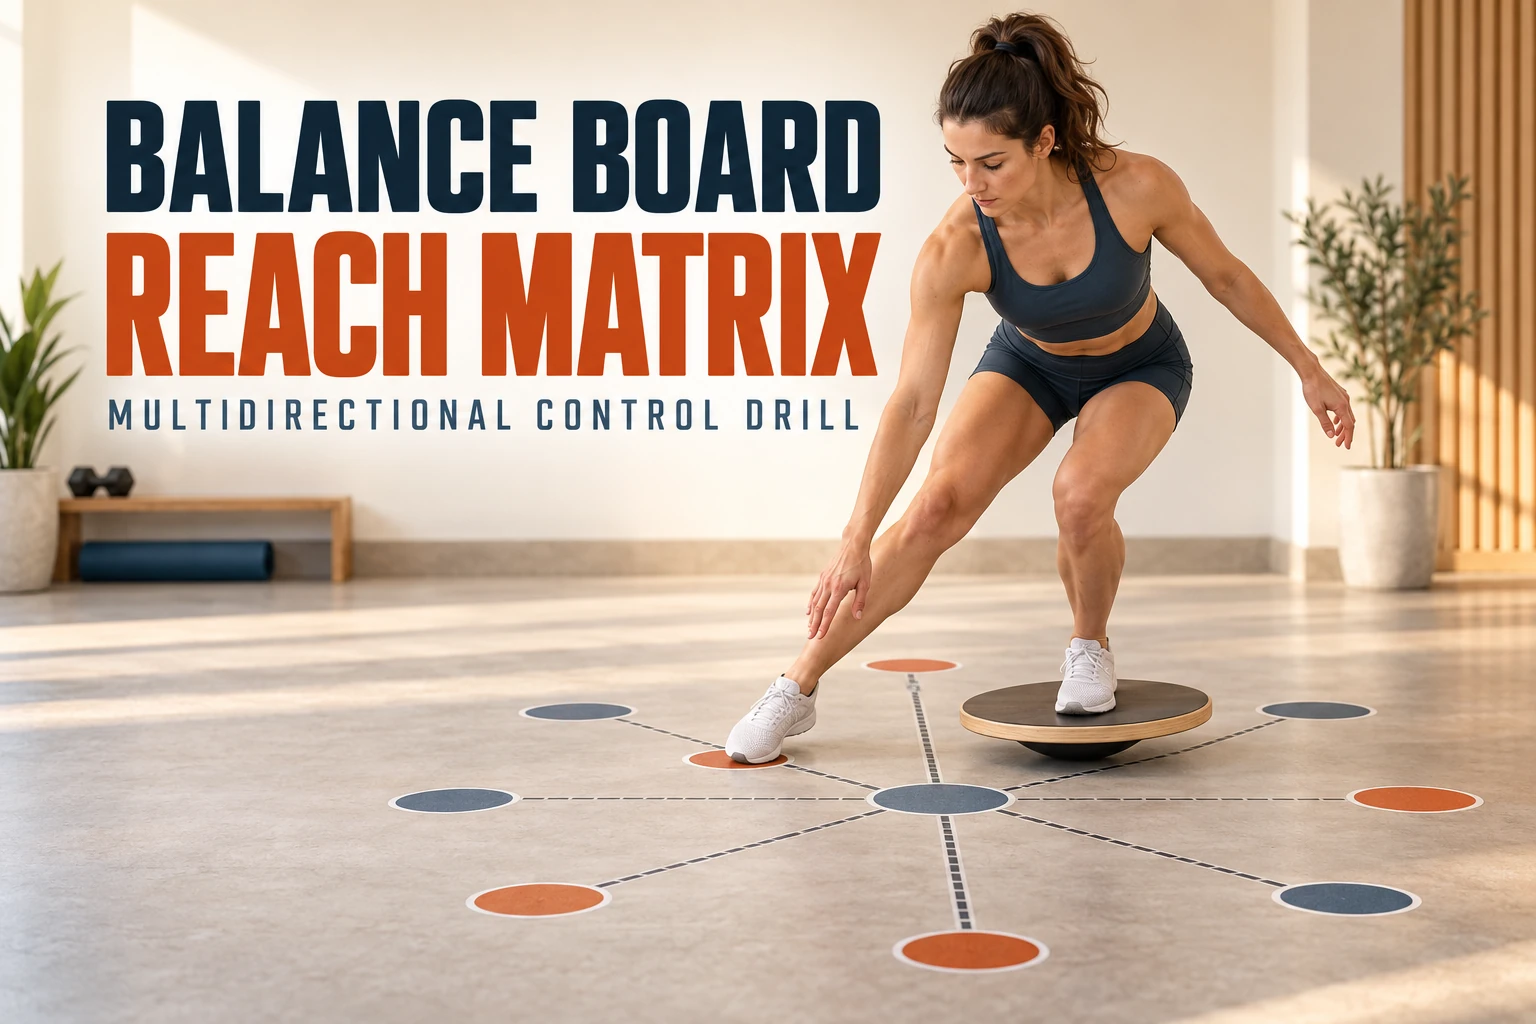
The balance board reach matrix is an intermediate control drill that combines single-leg balance with light foot taps in eight directions. The objective is not to reach as far as possible—it is to keep the stance foot, knee, hips and board organized while the free leg moves.
A reach matrix changes balance from a static hold into a multidirectional task. Your stance leg must keep adjusting as the free leg moves forward, sideways and behind you. The farther you reach, the more your center of mass shifts away from the base of support.
This version uses a balance board to increase the challenge. It is inspired by multidirectional reaching drills, but it is not a standardized Star Excursion Balance Test or Y-Balance Test. Do not use the results to diagnose an injury or compare yourself with clinical scoring standards.

Balance board reach matrix overview
| Primary areas challenged | Foot and ankle control, quadriceps, glutes, lateral hip muscles and trunk stability |
|---|---|
| Movement pattern | Single-leg stance with multidirectional toe taps |
| Recommended support | Wall, fixed rail or sturdy countertop within fingertip reach |
| Not recommended for | Free-moving roller boards, newly injured ankles or anyone unable to step off safely |
Equipment and setup
Choose the right board
A low round wobble board is the most natural choice because it can tilt in every direction while remaining in one location. A single-axis rocker can also work, but it cannot respond equally to all eight directions. With a rocker, perform one movement plane at a time and rotate the board between sets.
Do not perform this version on a free roller board. A loose roller allows the entire deck to travel, making a single-leg reach unnecessarily unpredictable. If you are unsure what type you own, see our wobble board vs. balance board comparison.
Create the target pattern
Place eight floor markers around the board like points on a compass. Cones, flat agility dots or small pieces of painter’s tape work well. Keep the first targets close enough that you can tap them without jumping, twisting aggressively or collapsing through the stance leg.
The directions are described relative to your body. “Forward” is directly in front of you even if the board is positioned differently in the room.
Prepare the training area
- Use a clean, dry and level floor approved for the board.
- Remove loose rugs, cords, pets and furniture from the step-off area.
- Place a fixed support within fingertip reach.
- Use secure shoes or train barefoot only when the deck is clean, comfortable and sufficiently grippy.
- Practice stepping off forward, backward and sideways before beginning.
The eight reach directions
| Number | Direction | Main control demand |
|---|---|---|
| 1 | Forward | Control the stance knee as the hips move slightly backward. |
| 2 | Forward-right | Blend forward reach with lateral hip control. |
| 3 | Right | Keep the pelvis level as the free leg moves sideways. |
| 4 | Back-right | Control rotation while reaching diagonally behind. |
| 5 | Back | Use a small hip hinge without arching the lower back. |
| 6 | Back-left | Maintain foot pressure while resisting excessive pelvic rotation. |
| 7 | Left | Keep the stance knee aligned while the free leg moves across the lateral field. |
| 8 | Forward-left | Return from the diagonal reach without rushing the board. |
Complete the pattern clockwise, return to the center after every tap and then repeat while standing on the opposite leg. The numbers organize the drill; they are not scores.
How to perform the balance board reach matrix
- Set your stance foot. Place one foot near the center of the board with pressure distributed through the heel, base of the big toe and base of the little toe.
- Find a controlled starting position. Use fingertip support, soften the stance knee and bring the board close to level.
- Lift the free foot. Hover it beside the board without hiking one hip or leaning heavily into the support.
- Reach toward target one. Move the free foot forward and tap the marker lightly. Do not transfer body weight onto the tapping foot.
- Return to the center. Bring the free foot back beside the board and reestablish control before moving again.
- Continue through targets two to eight. Use the same controlled tap-and-return pattern in every direction.
- Reset between repetitions. If the board edge hits the floor hard or the stance knee collapses inward, shorten the next reach.
- Switch sides. Step down carefully, rest as needed and repeat with the opposite stance leg.
Form cues that improve control
Use a tripod foot
Maintain contact through the heel and both sides of the forefoot. Avoid gripping aggressively with the toes or rolling entirely onto one edge of the foot.
Keep a soft stance knee
A slightly bent knee allows useful ankle, knee and hip adjustments. Keep it generally tracking over the middle toes rather than dropping sharply inward.
Keep the hips level
Reach from the hip without allowing the free side of the pelvis to lift dramatically. Some movement is normal; the goal is organized control, not rigidity.
Make the tap quiet
The free foot touches the target for orientation, not support. A quiet tap makes it easier to keep most of your weight over the stance leg.
Control the board
The board does not have to remain perfectly level, but its movement should stay gradual. Hard edge strikes usually mean the reach is too long or too fast.
Return before continuing
Pause near the center after each direction. Flowing rapidly from one target to another can hide poor control and turn the drill into a speed challenge.
Common balance board reach-matrix mistakes
| Mistake | Why it matters | Correction |
|---|---|---|
| Reaching too far | Encourages a heavy toe plant, hip twist or hop. | Move every target closer and rebuild the pattern. |
| Using the reach foot for support | Removes much of the single-leg control demand. | Tap lightly enough that the marker would barely move. |
| Stance knee collapsing inward | Shows that the current range exceeds organized control. | Shorten the reach and use more hand support. |
| Board edge slamming down | Adds unnecessary impact and breaks the controlled rhythm. | Slow down and reduce the distance. |
| Holding the breath | Often accompanies excessive tension and rushing. | Exhale gently during the reach and inhale on the return. |
| Skipping the weaker direction | Turns the matrix into a collection of favorite movements. | Train all eight directions within the range available that day. |
Muscles and movement qualities trained
The reach matrix is best understood as a coordination exercise rather than a maximal-strength movement. Several muscle groups contribute:
- Foot and ankle muscles make repeated small corrections as the board tilts.
- Calf muscles help manage forward and backward motion at the ankle.
- Quadriceps support the softly bent stance knee.
- Gluteal and lateral hip muscles help organize the pelvis and femur during diagonal and sideways reaches.
- Trunk muscles limit unnecessary leaning and rotation as the free leg moves.
The drill may complement an ankle-strength program, but it does not replace progressively loaded calf raises, tibialis work, squats, hinges or other stable strength exercises. See our guide to balance boards for ankle strength for equipment considerations.
Potential benefits of the reach matrix
Multidirectional balance practice
Static standing asks you to control one position. The reach matrix asks you to maintain the stance while your center of mass and free leg move through several directions.
Foot, ankle and hip coordination
The drill encourages the lower leg and hip to share the work. If the reach is appropriately scaled, the ankle can make small corrections while the hip helps control the knee and pelvis.
Side-to-side comparison
Performing the same pattern on both legs may reveal directions that feel less coordinated. Treat those observations as training information, not a diagnosis. Fatigue, practice, limb length and familiarity can all affect reach quality.
Clear progression
The exercise is easy to scale by changing reach distance, hand support, board height, tempo or number of directions. You can progress without immediately adding external weight.
Balance training can improve dynamic balance in several studied populations, including people with chronic ankle instability. However, results from clinical research should not be used to promise that this one balance-board drill will prevent injuries or treat instability.
Regressions and progressions
Make the exercise easier
- Practice the reach matrix on the floor before using a balance board.
- Use two fingers or one hand on fixed support.
- Bring all eight targets closer.
- Perform only the forward, right, back and left directions.
- Use a lower wobble board or a rocker aligned with the direction of movement.
- Touch the free foot down beside the board between directions.
Make the exercise harder
- Reduce hand support gradually.
- Increase one or two reach distances slightly rather than moving every marker at once.
- Pause for one or two seconds at each target.
- Use a three-second reach and three-second return.
- Hold a very light object at chest height after mastering the unloaded drill.
- Complete the targets in a random order called by a training partner.
Adjusting the drill for different board types
| Board type | Recommended use | Main caution |
|---|---|---|
| Round wobble board | Best match for the full eight-direction pattern. | Begin with a low base and fingertip support. |
| Single-axis rocker | Train one plane at a time, then rotate the board. | Do not force multidirectional motion from a board designed to rock in one direction. |
| Adjustable multi-mode board | Use the most constrained wobble configuration first. | Confirm that all components and stops are secured. |
| Free roller board | Choose a different two-foot exercise. | Deck travel makes this single-leg toe-tap drill unnecessarily risky. |
If you need equipment that better matches your current ability, compare our recommended balance boards by skill level.
How to program the reach matrix
| Goal | Volume | Rest | Focus |
|---|---|---|---|
| Learn the pattern | 1 round of 4 main directions per side | 30–60 seconds | Light support and short reaches |
| General balance practice | 1–2 rounds of all 8 directions per side | 45–75 seconds | Quiet taps and complete returns |
| Control under fatigue | 2 rounds per side late in a light workout | 60–90 seconds | Stop before form deteriorates |
| Sport-support session | 2–3 rounds per side, 2 days weekly | 60–90 seconds | Direction-specific control, not maximal reach |
Use the drill early in a workout when learning it or later as light accessory work once your technique is consistent. Avoid placing it immediately after exhaustive leg training if fatigue makes mounting and stepping off unpredictable.
For a broader library of movements, visit our balance board exercise library. New users should begin with the 12 balance board exercises for beginners before attempting this intermediate variation.
Who should modify or skip this drill?
Use a floor-based reach or seek individualized guidance if you have:
- A recent ankle, knee or hip injury
- Recent lower-extremity surgery
- Unexplained falls, significant dizziness or vertigo
- Reduced sensation in the feet
- Repeated episodes of the ankle or knee giving way
- Inability to mount and step off the board consistently
A challenging exercise should still feel controllable. Sharp pain, sudden instability, faintness or neurological symptoms are reasons to stop—not cues to push through.
Frequently asked questions
Is the balance board reach matrix a beginner exercise?
No. It is an intermediate drill because it combines single-leg balance, an unstable surface and multidirectional movement. Beginners should first master two-foot holds, weight shifts and supported reaches.
How far should I reach?
Reach only as far as you can tap lightly and return without hopping, heavily planting the free foot, collapsing the stance knee or slamming the board edge down.
Should the board remain perfectly level?
No. Small controlled tilts are expected. The goal is gradual, organized movement rather than complete stillness.
Can I perform it on a rocker board?
Yes, but train one plane at a time. Rotate the rocker between sets rather than trying to force eight-direction movement from a single-axis design.
Can I perform it on a roller board?
A free roller is not recommended for this single-leg version. Use a stationary wobble or controlled rocker board and reserve the roller for appropriate two-foot drills.
Is this the same as the Star Excursion Balance Test?
No. The drill borrows the general idea of reaching in several directions, but it uses an unstable board and is not administered or scored as a standardized clinical assessment.
How often can I practice it?
One to three short sessions per week is sufficient for many recreational users. Leave enough recovery that the feet, calves and stance leg are not excessively fatigued at the next session.
The bottom line
The balance board reach matrix is a useful intermediate drill for practicing control in multiple directions. Its value comes from maintaining an organized stance while the free leg moves—not from reaching the farthest target or creating the most wobble.
Start with close markers, stable support and a low wobble board. Keep the stance foot centered, the knee softly bent and the taps quiet. Increase the challenge only when you can return from every direction without rushing or losing control.
Research references
- Kinzey SJ, Armstrong CW. The reliability of the star-excursion test in assessing dynamic balance. Journal of Orthopaedic & Sports Physical Therapy.
- Powden CJ, Dodds TK, Gabriel EH. The reliability of the Star Excursion Balance Test and Lower Quarter Y-Balance Test in healthy adults. International Journal of Sports Physical Therapy.
- Jiang C, et al. Effects of balance training on dynamic postural stability in patients with chronic ankle instability. Journal of Sports Medicine and Physical Fitness.
- Mollà-Casanova S, Inglés M, Serra-Añó P. Effects of balance training on functionality, ankle instability and dynamic balance outcomes. Clinical Rehabilitation.
Leave a Reply